| How to Move a Picture in Word [3 Different Ways] | 您所在的位置:网站首页 › move in different ways › How to Move a Picture in Word [3 Different Ways] |
How to Move a Picture in Word [3 Different Ways]
How to Move a Picture in Word [3 Different Ways] Learn how to freely move your pictures without restrictions
by Milan Stanojevic
 Milan Stanojevic
Windows & Software Expert
Milan has been enthusiastic about technology ever since his childhood days, and this led him to take interest in all PC-related technologies. He's a PC enthusiast and he... read more
Updated on February 13, 2023
Reviewed by
Vlad Turiceanu
Milan Stanojevic
Windows & Software Expert
Milan has been enthusiastic about technology ever since his childhood days, and this led him to take interest in all PC-related technologies. He's a PC enthusiast and he... read more
Updated on February 13, 2023
Reviewed by
Vlad Turiceanu
 Vlad Turiceanu
Editor-in-Chief
Passionate about technology, Windows, and everything that has a power button, he spent most of his time developing new skills and learning more about the tech world. Coming... read more
Affiliate Disclosure
3
Word is one of the most popular applications in the Microsoft Office suite.
Word can do all sorts of things, and in this article, we’ll show you how to move an image in Word.
We will also show you how to wrap text around a picture.
Vlad Turiceanu
Editor-in-Chief
Passionate about technology, Windows, and everything that has a power button, he spent most of his time developing new skills and learning more about the tech world. Coming... read more
Affiliate Disclosure
3
Word is one of the most popular applications in the Microsoft Office suite.
Word can do all sorts of things, and in this article, we’ll show you how to move an image in Word.
We will also show you how to wrap text around a picture.

Microsoft Word is the most popular word processor in the world, and it is heavily used by both home and office users. Word has a wide array of features, and in today’s article, we’re going to show you how to move a picture in Word and how to wrap text around it. How can I move pictures in Word? 1. Wrap text around it Open Word, create a new document, and add a picture to it. Now select the picture that you added. Go to the Layout tab and choose Wrap Text. Select any option from the menu except In Line with Text.
 The text will now wrap around the image.
To move the image, simply click the image and drag it to the desired position.
The text will now wrap around the image.
To move the image, simply click the image and drag it to the desired position.
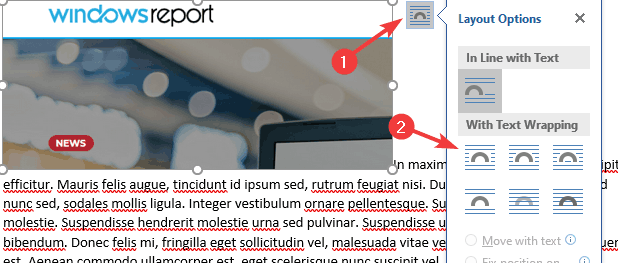
You can also experiment with different layout options in order to find suitable text wrapping for your needs. 2. Move an image to an exact position Go to Layout > Wrap Text > More Layout Options. Alternatively, you can select the image, and go to Layout Options > See more. Now you’ll be able to set the exact position relative to column, page, characters, and other elements.
For more precision, you can also use the advanced layout options. To do that, follow the steps above. This option is useful if you’re planning to print a document, and you need to ensure that your images are positioned perfectly for printing. Read more about this topic How to Make a Checklist in Microsoft Word Fix: Microsoft Office not opening [Word, Excel, PowerPoint] Word Autosave Location: Where Is It And How to Access It 3. Freely move a picture using arrow keys1. Open Microsoft Word. 2. Upload the image you want to add to it, then select it. 3. Go to Layout options. 4. Select any option from the With Text Wrapping section.
5. The text will now wrap around your image and you can move it freely. An easy method to move a picture in Word is to change the Layout Option right from the image itself. You can also move your image pixel by pixel by using the arrow keys. Wrapping text around an image in Word and moving the image is pretty simple, and you just need to use the Wrap Text feature in Word. Thus, you will be able to freely move a picture in Word. After doing that, you should be able to move the image freely simply by dragging it to the desired position. If you found this guide useful, let us know in the comments below. Still having issues? Fix them with this tool: SPONSORED If the advices above haven't solved your issue, your PC may experience deeper Windows problems. We recommend downloading this PC Repair tool (rated Great on TrustPilot.com) to easily address them. After installation, simply click the Start Scan button and then press on Repair All. This article covers:Topics: Microsoft Word Was this page helpful? x Start a conversation comments Leave a Reply Cancel reply Copy link |
【本文地址】